

Showing posts with label Party Decoration. Show all posts
Showing posts with label Party Decoration. Show all posts
Tutorial: Vellum Garland Backdrop
I'm sharing my Anthropologie inspired vellum garland tutorial over at Bird's Party today. Makes the perfect backdrop for an Under the Sea party!


Tutorial: Vintage Fabric Doily Globes
Remember these fabric doily globes from Petite Social's Vintage Teddy Bear Tea Party? My gal pal, Katie, is here today to show you how to add a little vintage flair to your next party with this easy DIY project.

Materials/Supplies:
* Round latex balloons
* Paint brush
* Fabric doilies
* Fabric stiffener
1. Blow up a round latex balloon and set it on top of a stand (a large pail works great) to keep it upright.
2. Cover the balloon with a doily.
3. Brush a generous amount of fabric stiffener all over the doily until it is soaked and sticking to the balloon. Let dry overnight.
4. The doily should now be stiff and secured to the balloon. Flip the balloon upside down, then overlap another doily onto the balloon.
5. Brush a generous amount of fabric stiffener all over the doily until is is soaked and sticking to the balloon. Let it dry overnight.
6. Once your doilies have hardened, pop the balloon with a need and gently pull out the popped balloon.
Voila! You can tie a string on the doily globe and hang as chandelier, or scatter on the floor for additional decor.
And don't forget about our giveaway to celebrate 2 years of blogging bliss -- going on until midnight EST tonight! Enter to win a complete party package from Edible Details, Tickled Peach Studio, Sweet Mady, and Lemon Drop Shop.
Petite Social: Website / Facebook / Twitter / Pinterest
Event Photography: MoxieSox Photography
Materials/Supplies:
* Round latex balloons
* Paint brush
* Fabric doilies
* Fabric stiffener
1. Blow up a round latex balloon and set it on top of a stand (a large pail works great) to keep it upright.
2. Cover the balloon with a doily.
3. Brush a generous amount of fabric stiffener all over the doily until it is soaked and sticking to the balloon. Let dry overnight.
4. The doily should now be stiff and secured to the balloon. Flip the balloon upside down, then overlap another doily onto the balloon.
5. Brush a generous amount of fabric stiffener all over the doily until is is soaked and sticking to the balloon. Let it dry overnight.
6. Once your doilies have hardened, pop the balloon with a need and gently pull out the popped balloon.
Voila! You can tie a string on the doily globe and hang as chandelier, or scatter on the floor for additional decor.
And don't forget about our giveaway to celebrate 2 years of blogging bliss -- going on until midnight EST tonight! Enter to win a complete party package from Edible Details, Tickled Peach Studio, Sweet Mady, and Lemon Drop Shop.
Petite Social: Website / Facebook / Twitter / Pinterest
Event Photography: MoxieSox Photography
Tutorial: Fringed Lantern
While I'm gearing up for the Avon Walk for Breast Cancer this weekend, Emily of Magnolia Creative Co. is in the house to share this fun and easy DIY project exclusively with our readers.
Hi! Emily here from Magnolia Creative Co. and I want to share with you my tutorial for Fringe Lanterns. I regularly read the blog, Oh Happy Day and just fell in love with her DIY Surprise Lantern tutorial. I planned to make them and place them in our outdoor party tent for my son's first birthday party - A Bayou Bash! So I set off to my local craft store to purchase the surprise. I couldn't find the required crepe paper sheets so in desperation I bought three different colors of crepe paper streamers and the Martha Stewart Fringe Scissors and decided to change up the tutorial just a bit.

Materials:
* Crepe Paper Streamers
* Paper Lanterns - even ripped or slightly torn ones work great because your covering them up
* Scissors - I recommend the Martha Stewart Fringe Scissors, they just make it easier
* Double Stick Tape

First take your scissors and cut little slits to make the fringe. Cut only about halfway through the streamer because you'll need the space for the tape. It helps if you unroll a lot from the spool. It's ok if you run out because you can always cut more and the seam will always be covered up with all the fringe. If you use the Martha Stewart Fringe Scissors I HIGHLY recommend putting a little WD40 in the hinge because the pure weight of the scissors can make them a little hard to use after a while. So the looser they are the better for your hands.

After you've cut some streamers run strips of double stick tape along the seams of the lantern. Make sure the tape runs the whole length of the lantern. It's just easier than having to add more while you're trying to work with the streamers.

Start adding the fringe streamers at the bottom of the lantern. Be sure to press down on the streamer to make sure it's fastened to the tape. Start going around the lantern. You can use the "ribs" of the lantern as a great ruler to help you place the streamer. Work your way around the lantern in a spiral until you reach the top. Use a little bit of scotch tape at the top to secure the streamer.

Fluff up your lantern, hang and enjoy. I used a safety pin through my lantern then tied a little sting to it and tied it to my chandelier. Have fun!

Hi! Emily here from Magnolia Creative Co. and I want to share with you my tutorial for Fringe Lanterns. I regularly read the blog, Oh Happy Day and just fell in love with her DIY Surprise Lantern tutorial. I planned to make them and place them in our outdoor party tent for my son's first birthday party - A Bayou Bash! So I set off to my local craft store to purchase the surprise. I couldn't find the required crepe paper sheets so in desperation I bought three different colors of crepe paper streamers and the Martha Stewart Fringe Scissors and decided to change up the tutorial just a bit.

Materials:
* Crepe Paper Streamers
* Paper Lanterns - even ripped or slightly torn ones work great because your covering them up
* Scissors - I recommend the Martha Stewart Fringe Scissors, they just make it easier
* Double Stick Tape
First take your scissors and cut little slits to make the fringe. Cut only about halfway through the streamer because you'll need the space for the tape. It helps if you unroll a lot from the spool. It's ok if you run out because you can always cut more and the seam will always be covered up with all the fringe. If you use the Martha Stewart Fringe Scissors I HIGHLY recommend putting a little WD40 in the hinge because the pure weight of the scissors can make them a little hard to use after a while. So the looser they are the better for your hands.
After you've cut some streamers run strips of double stick tape along the seams of the lantern. Make sure the tape runs the whole length of the lantern. It's just easier than having to add more while you're trying to work with the streamers.
Start adding the fringe streamers at the bottom of the lantern. Be sure to press down on the streamer to make sure it's fastened to the tape. Start going around the lantern. You can use the "ribs" of the lantern as a great ruler to help you place the streamer. Work your way around the lantern in a spiral until you reach the top. Use a little bit of scotch tape at the top to secure the streamer.
Fluff up your lantern, hang and enjoy. I used a safety pin through my lantern then tied a little sting to it and tied it to my chandelier. Have fun!
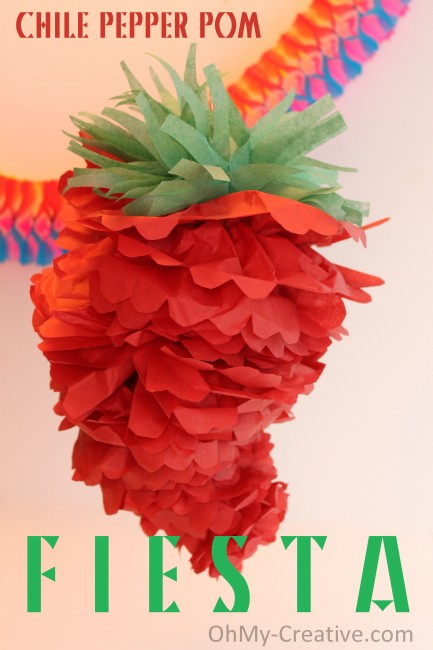
Tutorial: Chile Pepper Pom
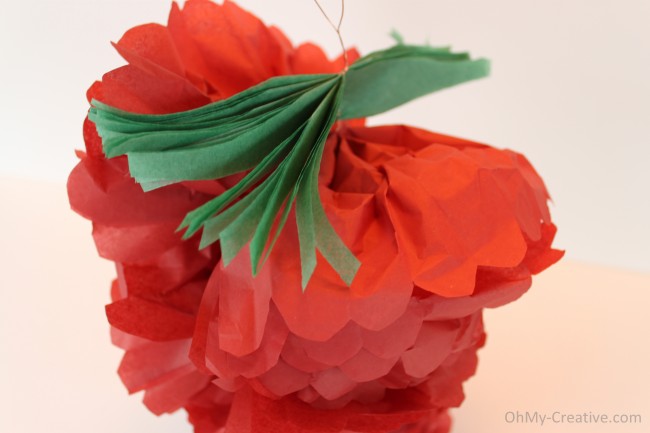
I'm so excited to be featuring party tutorials from our readers again. Up first is a festive chile pepper pom how-to sent to us by Susan of Oh My! Creative just in time for Cinco de Mayo. Oh My! Creative is a community for sharing creative projects and it's absolutely free to join. We're all about DIY projects around here too, so if you have a little somethin' somethin' that you'd like to share, please send your submission to christine@purejoyeventsblog.com.

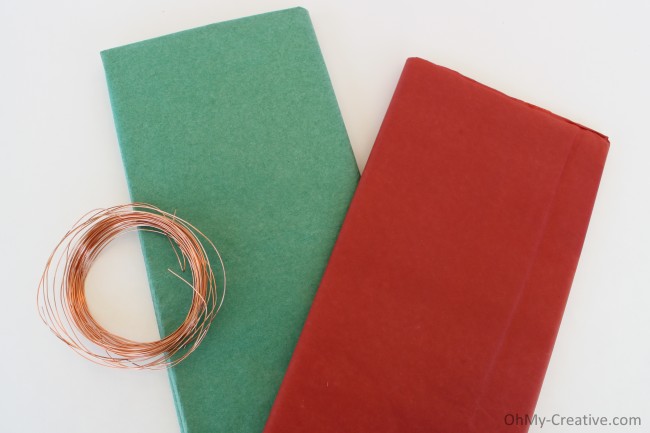
This is easy! Supplies – Beading wire, green and red tissue paper. I found mine at the store Five Below…they were a little deeper in color and only cost a dollar each. I should be able to get two Chile Pepper Poms out of a pack of red. Only one pack of green is needed to make multiple poms.

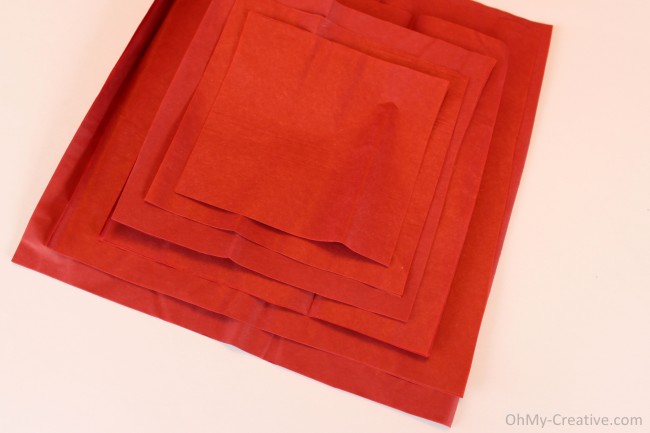
I cut the red tissue paper into squares about 4-5 sheets at each size. I started with 9″ squares reducing the size by about an 1/2″ until I reached 4″ squares. Six sizes in all to create one pom. Nothing was exact…I didn’t measure a thing!

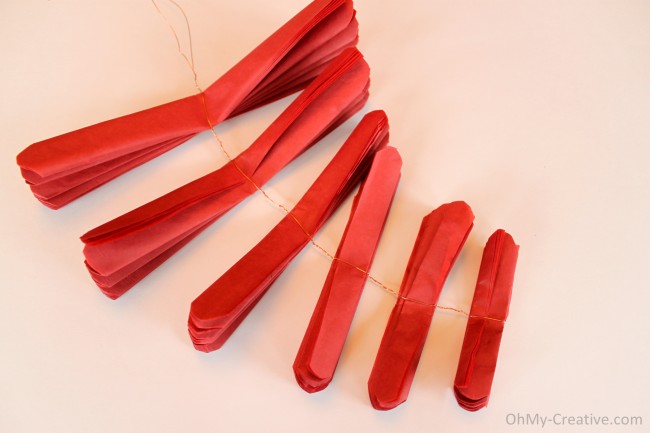
Cut a long piece of wire and fold it in half. Accordion fold each size and round the ends on both sides. Starting with the smallest, wrapped the wire around the folded tissue. Twist the wire between each size of tissue about 3/4″ for the smaller squares and 1″ between the larger squares. I love how the wire naturally started to curve like a chile pepper!

Gently fluff your pom starting at the bottom, filling in the spaces created by the wire.

To finish off the pom, accordion fold the green tissue to create a green top. Instead of rounding the ends, I made about 3″ cuts, down the folded sides, to give the tissue a “spiky” look! Attach with no large space in the wire.

Oh My! Creative: Website / Blog / Facebook / Twitter / Pinterest
This is easy! Supplies – Beading wire, green and red tissue paper. I found mine at the store Five Below…they were a little deeper in color and only cost a dollar each. I should be able to get two Chile Pepper Poms out of a pack of red. Only one pack of green is needed to make multiple poms.
I cut the red tissue paper into squares about 4-5 sheets at each size. I started with 9″ squares reducing the size by about an 1/2″ until I reached 4″ squares. Six sizes in all to create one pom. Nothing was exact…I didn’t measure a thing!
Cut a long piece of wire and fold it in half. Accordion fold each size and round the ends on both sides. Starting with the smallest, wrapped the wire around the folded tissue. Twist the wire between each size of tissue about 3/4″ for the smaller squares and 1″ between the larger squares. I love how the wire naturally started to curve like a chile pepper!
Gently fluff your pom starting at the bottom, filling in the spaces created by the wire.

To finish off the pom, accordion fold the green tissue to create a green top. Instead of rounding the ends, I made about 3″ cuts, down the folded sides, to give the tissue a “spiky” look! Attach with no large space in the wire.
Oh My! Creative: Website / Blog / Facebook / Twitter / Pinterest
Tutorial Tuesday: Glittery Prom Girl
Melissa from Buckets of Grace is in the house! She's here to share a DIY project from her daughter's Enchanted Prom Birthday Party.
Thank you to Christine for featuring a tutorial on Grace's Glittery Prom Girl. The Prom Girl was the belle of the ball! Not only was she adorable, but she was inexpensive and easy to make. This technique can be used for any sort of decoration - a large monogram, a dinosaur, the possibilities are endless!
Here are the materials you will need:
* Transparency
* Photo copier
* Overhead projector
* Exacto knife
* Matte board
* School glue
* 1 or 2 bottles of glitter
* Spray lacquer
* Large frame (optional)
* Fabric (optional)
* Satin ribbon (optional)


I couldn't part with the Prom Girl after the party. She now proudly hangs in my craft room as a sparkly new addition!
Thank you Christine for letting me share our fun project on your fabulous site!
Thank you to Christine for featuring a tutorial on Grace's Glittery Prom Girl. The Prom Girl was the belle of the ball! Not only was she adorable, but she was inexpensive and easy to make. This technique can be used for any sort of decoration - a large monogram, a dinosaur, the possibilities are endless!
Here are the materials you will need:
* Transparency
* Photo copier
* Overhead projector
* Exacto knife
* Matte board
* School glue
* 1 or 2 bottles of glitter
* Spray lacquer
* Large frame (optional)
* Fabric (optional)
* Satin ribbon (optional)
- Take the invitation and transfer the Prom Girl to a transparency using a photo copy machine.

- Use an overhead projector to project the image. Then trace the image onto a piece of matte board (purchased from Hobby Lobby for 50% off).
- Use an exacto knife to carefully cut out the image.
- Put glue on one workable section at a time, then spread it with your finger. Working quickly, sprinkle the glitter over the glue. Repeat this until the entire object is covered in glitter.
- Allow the glue and glitter to dry, then spray the Prom Girl with lacquer. Spray on a few coats, allowing it to dry between coats.
- Staple fabric to the back side of the frame using a staple gun.
- Once the Prom Girl is completely dry, staple her to the frame. If she fits in the frame, use hot glue or fabric glue to adhere her to the fabric.
- Staple a piece of satin ribbon to the center of the frame to create an illusion that she is hanging from the ribbon. Finally, hang the frame from a nail on the wall.

I couldn't part with the Prom Girl after the party. She now proudly hangs in my craft room as a sparkly new addition!
Thank you Christine for letting me share our fun project on your fabulous site!
Tutorial: Transformers Party Banner
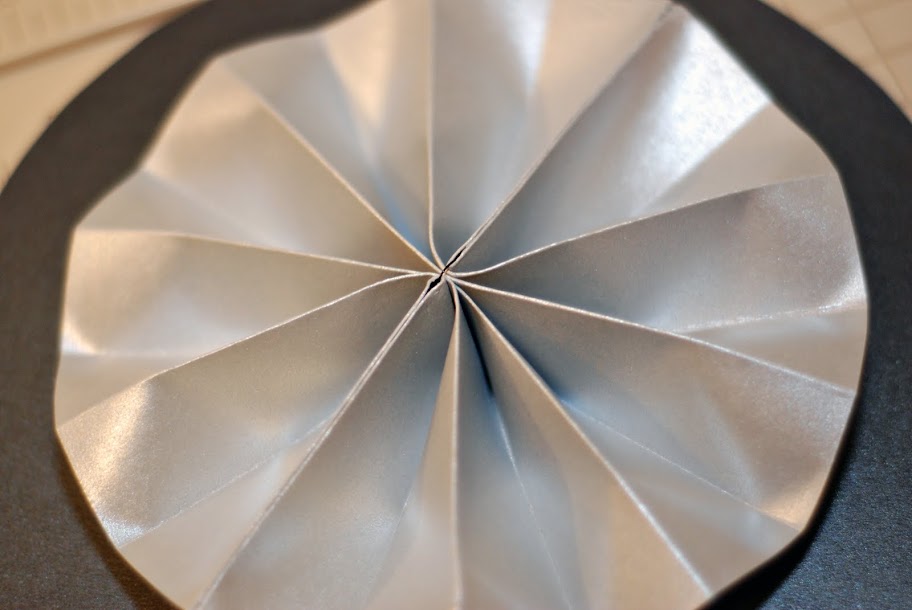
Since Autobots transform into vehicles, I decided to make a banner that resembles chrome wheels and customize it with Camden's name. These decorations are also great for car theme parties.

For this tutorial, you'll need 12"x12" silver metallic card stock (each sheet makes 2 hubcaps), 8.5"x11" black card stock for each letter in the name, 8.5"x11" red card stock, glue, and scrapbook wire.
1. Cut the 12"x12" silver card stock in half and score 1" lines along the shorter side.

2. Make a fan, then make a score down the middle.
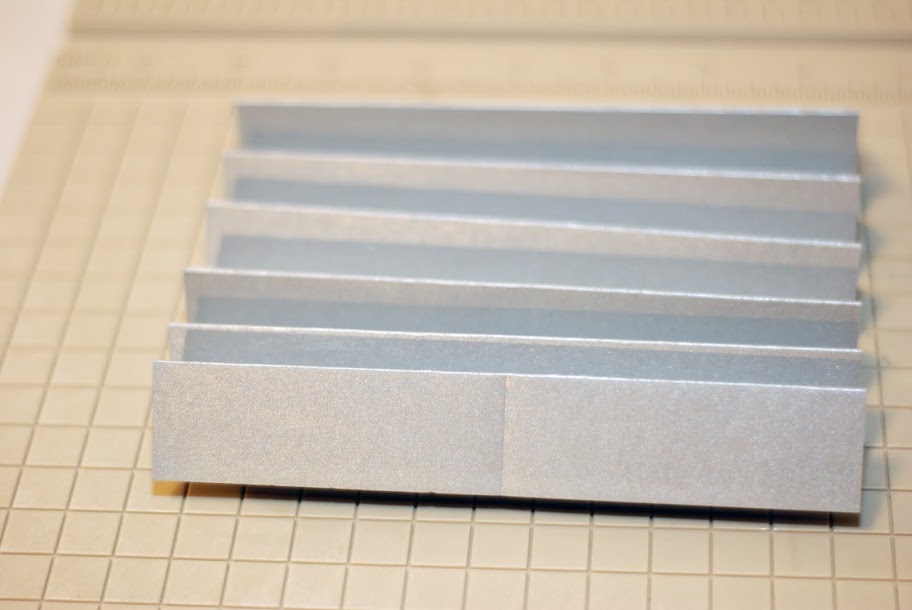
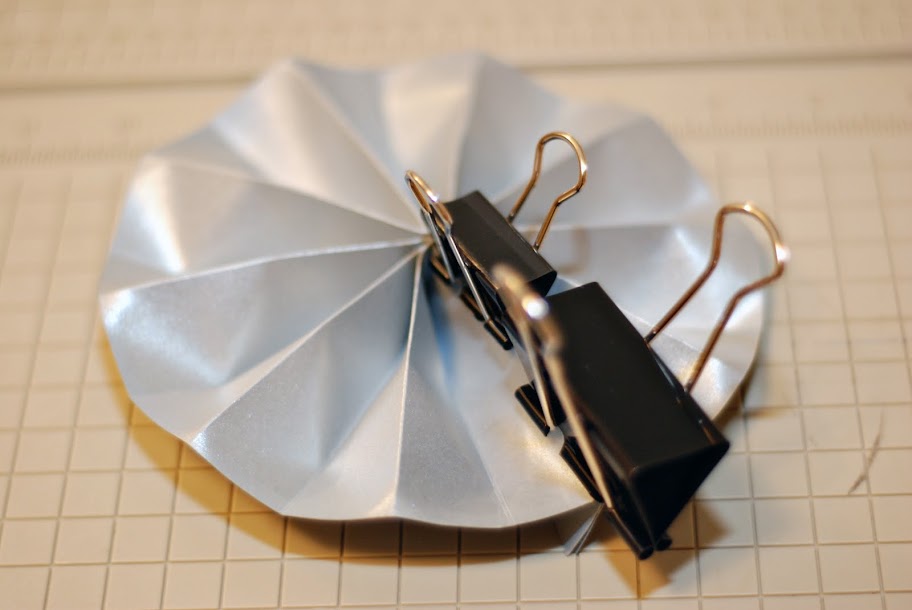
3. Bend the strip in half and glue the ends together. Use paper binding clips to help keep it in place. Repeat on the other side.


4. Trace and cut an 8 1/4" circle out of the black paper. I used a round cookie tin lid for tracing. Then make a small hole in the center of the tire.
5. Thread scrapbook wire through the center of the hubcap and tire.

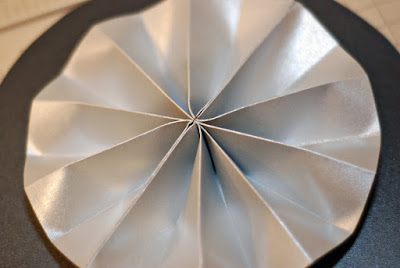
6. Print the name of the birthday boy on plain copier paper. Cut the letters and trace them onto the red card stock. Cut out the red letters and glue them onto a wheel.
See the completed banner and details of the Transformer party when I post pictures this weekend.
For this tutorial, you'll need 12"x12" silver metallic card stock (each sheet makes 2 hubcaps), 8.5"x11" black card stock for each letter in the name, 8.5"x11" red card stock, glue, and scrapbook wire.
1. Cut the 12"x12" silver card stock in half and score 1" lines along the shorter side.

2. Make a fan, then make a score down the middle.
3. Bend the strip in half and glue the ends together. Use paper binding clips to help keep it in place. Repeat on the other side.
4. Trace and cut an 8 1/4" circle out of the black paper. I used a round cookie tin lid for tracing. Then make a small hole in the center of the tire.
5. Thread scrapbook wire through the center of the hubcap and tire.

6. Print the name of the birthday boy on plain copier paper. Cut the letters and trace them onto the red card stock. Cut out the red letters and glue them onto a wheel.
See the completed banner and details of the Transformer party when I post pictures this weekend.


Subscribe to:
Posts (Atom)


