

Showing posts with label DIY Project. Show all posts
Showing posts with label DIY Project. Show all posts
Tutorial: Favor Bag Backdrop
I had the hardest time coming up with a backdrop for the cake table at Camden's Angry Birds birthday party. My idea of using Post-It Notes to create a pixelated backdrop sounded brilliant, but it turned out to be a flop (which was why I had so many Post-It Notes for the neon heart backdrop). Finally, I came up with this 3-D backdrop using the polka dotted bags that were used to hold the party favors. As promised, here's the super simple tutorial to recreate this favor bag backdrop : )


Tutorial: Neon Heart Post-It Notes Backdrop
With Valentine's Day less than a week away, I'm sharing my Neon Heart Post-It Notes backdrop tutorial on Bird's Party today. Of course this technique of folding over Post-It Notes could be used to make all sorts of gorgeous graphic backdrops. Check out my Post-It Notes Art board on Pinterest for more inspiration.


Tutorial: Vellum Garland Backdrop
I'm sharing my Anthropologie inspired vellum garland tutorial over at Bird's Party today. Makes the perfect backdrop for an Under the Sea party!

Tutorial: Vintage Fabric Doily Globes
Remember these fabric doily globes from Petite Social's Vintage Teddy Bear Tea Party? My gal pal, Katie, is here today to show you how to add a little vintage flair to your next party with this easy DIY project.

Materials/Supplies:
* Round latex balloons
* Paint brush
* Fabric doilies
* Fabric stiffener
1. Blow up a round latex balloon and set it on top of a stand (a large pail works great) to keep it upright.
2. Cover the balloon with a doily.
3. Brush a generous amount of fabric stiffener all over the doily until it is soaked and sticking to the balloon. Let dry overnight.
4. The doily should now be stiff and secured to the balloon. Flip the balloon upside down, then overlap another doily onto the balloon.
5. Brush a generous amount of fabric stiffener all over the doily until is is soaked and sticking to the balloon. Let it dry overnight.
6. Once your doilies have hardened, pop the balloon with a need and gently pull out the popped balloon.
Voila! You can tie a string on the doily globe and hang as chandelier, or scatter on the floor for additional decor.
And don't forget about our giveaway to celebrate 2 years of blogging bliss -- going on until midnight EST tonight! Enter to win a complete party package from Edible Details, Tickled Peach Studio, Sweet Mady, and Lemon Drop Shop.
Petite Social: Website / Facebook / Twitter / Pinterest
Event Photography: MoxieSox Photography
Materials/Supplies:
* Round latex balloons
* Paint brush
* Fabric doilies
* Fabric stiffener
1. Blow up a round latex balloon and set it on top of a stand (a large pail works great) to keep it upright.
2. Cover the balloon with a doily.
3. Brush a generous amount of fabric stiffener all over the doily until it is soaked and sticking to the balloon. Let dry overnight.
4. The doily should now be stiff and secured to the balloon. Flip the balloon upside down, then overlap another doily onto the balloon.
5. Brush a generous amount of fabric stiffener all over the doily until is is soaked and sticking to the balloon. Let it dry overnight.
6. Once your doilies have hardened, pop the balloon with a need and gently pull out the popped balloon.
Voila! You can tie a string on the doily globe and hang as chandelier, or scatter on the floor for additional decor.
And don't forget about our giveaway to celebrate 2 years of blogging bliss -- going on until midnight EST tonight! Enter to win a complete party package from Edible Details, Tickled Peach Studio, Sweet Mady, and Lemon Drop Shop.
Petite Social: Website / Facebook / Twitter / Pinterest
Event Photography: MoxieSox Photography
Tutorial: Fringed Lantern
While I'm gearing up for the Avon Walk for Breast Cancer this weekend, Emily of Magnolia Creative Co. is in the house to share this fun and easy DIY project exclusively with our readers.
Hi! Emily here from Magnolia Creative Co. and I want to share with you my tutorial for Fringe Lanterns. I regularly read the blog, Oh Happy Day and just fell in love with her DIY Surprise Lantern tutorial. I planned to make them and place them in our outdoor party tent for my son's first birthday party - A Bayou Bash! So I set off to my local craft store to purchase the surprise. I couldn't find the required crepe paper sheets so in desperation I bought three different colors of crepe paper streamers and the Martha Stewart Fringe Scissors and decided to change up the tutorial just a bit.

Materials:
* Crepe Paper Streamers
* Paper Lanterns - even ripped or slightly torn ones work great because your covering them up
* Scissors - I recommend the Martha Stewart Fringe Scissors, they just make it easier
* Double Stick Tape

First take your scissors and cut little slits to make the fringe. Cut only about halfway through the streamer because you'll need the space for the tape. It helps if you unroll a lot from the spool. It's ok if you run out because you can always cut more and the seam will always be covered up with all the fringe. If you use the Martha Stewart Fringe Scissors I HIGHLY recommend putting a little WD40 in the hinge because the pure weight of the scissors can make them a little hard to use after a while. So the looser they are the better for your hands.

After you've cut some streamers run strips of double stick tape along the seams of the lantern. Make sure the tape runs the whole length of the lantern. It's just easier than having to add more while you're trying to work with the streamers.

Start adding the fringe streamers at the bottom of the lantern. Be sure to press down on the streamer to make sure it's fastened to the tape. Start going around the lantern. You can use the "ribs" of the lantern as a great ruler to help you place the streamer. Work your way around the lantern in a spiral until you reach the top. Use a little bit of scotch tape at the top to secure the streamer.

Fluff up your lantern, hang and enjoy. I used a safety pin through my lantern then tied a little sting to it and tied it to my chandelier. Have fun!

Hi! Emily here from Magnolia Creative Co. and I want to share with you my tutorial for Fringe Lanterns. I regularly read the blog, Oh Happy Day and just fell in love with her DIY Surprise Lantern tutorial. I planned to make them and place them in our outdoor party tent for my son's first birthday party - A Bayou Bash! So I set off to my local craft store to purchase the surprise. I couldn't find the required crepe paper sheets so in desperation I bought three different colors of crepe paper streamers and the Martha Stewart Fringe Scissors and decided to change up the tutorial just a bit.

Materials:
* Crepe Paper Streamers
* Paper Lanterns - even ripped or slightly torn ones work great because your covering them up
* Scissors - I recommend the Martha Stewart Fringe Scissors, they just make it easier
* Double Stick Tape
First take your scissors and cut little slits to make the fringe. Cut only about halfway through the streamer because you'll need the space for the tape. It helps if you unroll a lot from the spool. It's ok if you run out because you can always cut more and the seam will always be covered up with all the fringe. If you use the Martha Stewart Fringe Scissors I HIGHLY recommend putting a little WD40 in the hinge because the pure weight of the scissors can make them a little hard to use after a while. So the looser they are the better for your hands.
After you've cut some streamers run strips of double stick tape along the seams of the lantern. Make sure the tape runs the whole length of the lantern. It's just easier than having to add more while you're trying to work with the streamers.
Start adding the fringe streamers at the bottom of the lantern. Be sure to press down on the streamer to make sure it's fastened to the tape. Start going around the lantern. You can use the "ribs" of the lantern as a great ruler to help you place the streamer. Work your way around the lantern in a spiral until you reach the top. Use a little bit of scotch tape at the top to secure the streamer.
Fluff up your lantern, hang and enjoy. I used a safety pin through my lantern then tied a little sting to it and tied it to my chandelier. Have fun!
Tutorial: Chile Pepper Pom
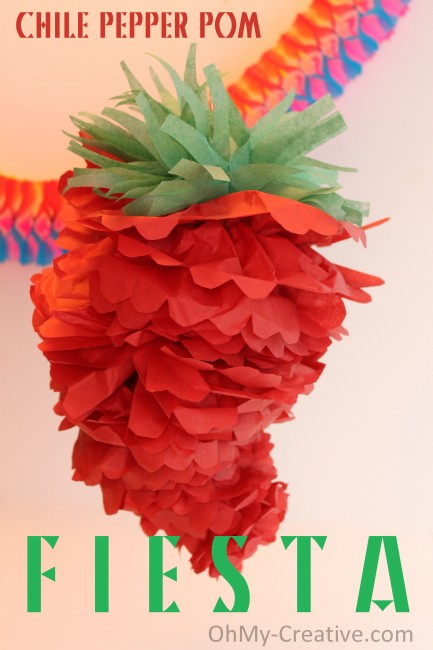
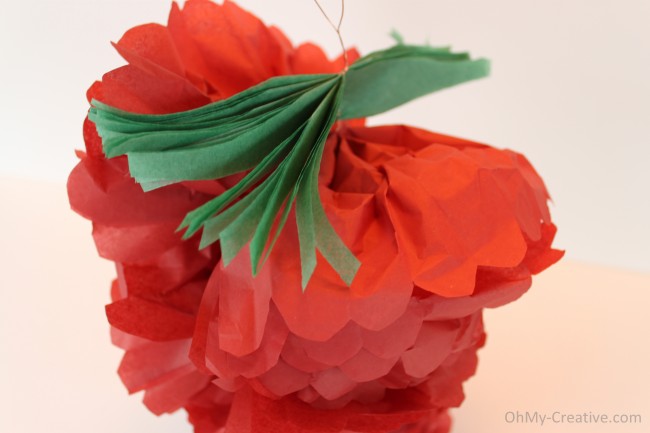
I'm so excited to be featuring party tutorials from our readers again. Up first is a festive chile pepper pom how-to sent to us by Susan of Oh My! Creative just in time for Cinco de Mayo. Oh My! Creative is a community for sharing creative projects and it's absolutely free to join. We're all about DIY projects around here too, so if you have a little somethin' somethin' that you'd like to share, please send your submission to christine@purejoyeventsblog.com.

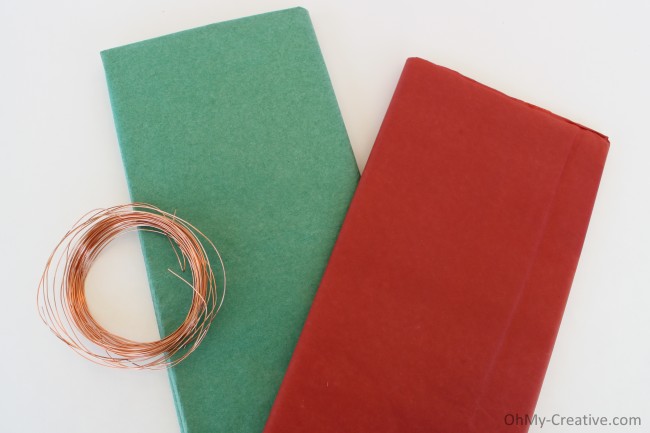
This is easy! Supplies – Beading wire, green and red tissue paper. I found mine at the store Five Below…they were a little deeper in color and only cost a dollar each. I should be able to get two Chile Pepper Poms out of a pack of red. Only one pack of green is needed to make multiple poms.

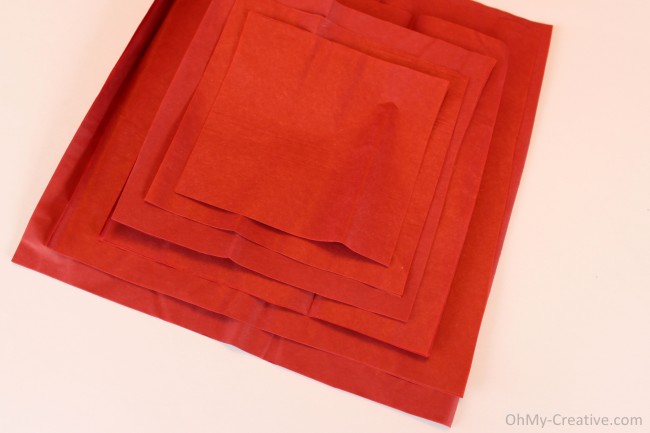
I cut the red tissue paper into squares about 4-5 sheets at each size. I started with 9″ squares reducing the size by about an 1/2″ until I reached 4″ squares. Six sizes in all to create one pom. Nothing was exact…I didn’t measure a thing!

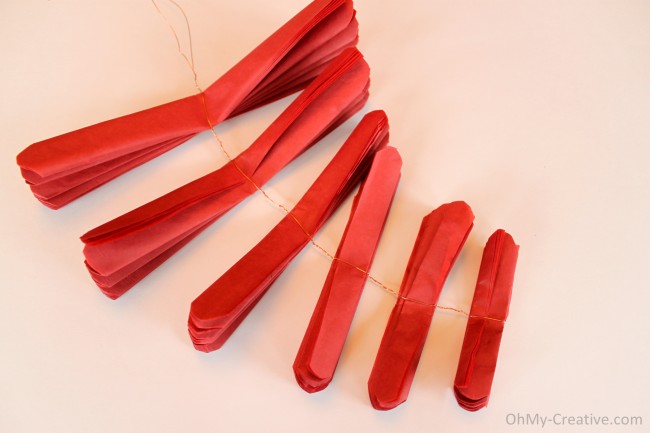
Cut a long piece of wire and fold it in half. Accordion fold each size and round the ends on both sides. Starting with the smallest, wrapped the wire around the folded tissue. Twist the wire between each size of tissue about 3/4″ for the smaller squares and 1″ between the larger squares. I love how the wire naturally started to curve like a chile pepper!

Gently fluff your pom starting at the bottom, filling in the spaces created by the wire.

To finish off the pom, accordion fold the green tissue to create a green top. Instead of rounding the ends, I made about 3″ cuts, down the folded sides, to give the tissue a “spiky” look! Attach with no large space in the wire.

Oh My! Creative: Website / Blog / Facebook / Twitter / Pinterest
This is easy! Supplies – Beading wire, green and red tissue paper. I found mine at the store Five Below…they were a little deeper in color and only cost a dollar each. I should be able to get two Chile Pepper Poms out of a pack of red. Only one pack of green is needed to make multiple poms.
I cut the red tissue paper into squares about 4-5 sheets at each size. I started with 9″ squares reducing the size by about an 1/2″ until I reached 4″ squares. Six sizes in all to create one pom. Nothing was exact…I didn’t measure a thing!
Cut a long piece of wire and fold it in half. Accordion fold each size and round the ends on both sides. Starting with the smallest, wrapped the wire around the folded tissue. Twist the wire between each size of tissue about 3/4″ for the smaller squares and 1″ between the larger squares. I love how the wire naturally started to curve like a chile pepper!
Gently fluff your pom starting at the bottom, filling in the spaces created by the wire.

To finish off the pom, accordion fold the green tissue to create a green top. Instead of rounding the ends, I made about 3″ cuts, down the folded sides, to give the tissue a “spiky” look! Attach with no large space in the wire.
Oh My! Creative: Website / Blog / Facebook / Twitter / Pinterest
Tutorial: Ombre Paint Stick Backdrop
I've been working a ton of overtime at my "real job", plus training for the Avon Walk in May, so the blog has taken a back seat these past few weeks. Thanks for hanging in there with me. While I was busy wrapping things up at work, my Anthropologie inspired ombre backdrop made it's debut on Bird's Party Magazine Spring/Summer 2012 issue.

For this DIY project, you'll need:
* 32 5 gallon wooden paint stirring sticks -- I scored these for free at my local Sherwin Williams paint store
* Martha Stewart Crafts multi-surface satin acrylic craft paint in Pond, Surf, Summer Haze, and Sea Lavender
* Paint brush
* Painter's tape

Paint 8 sticks (all sides except for the back) with the Pond paint color. Repeat with the Surf, Summer Haze, and Sea Lavender paints.

When the paint has completely dried, place rolled up pieces of painter's tape on the back of each stick. Starting with the Pond colored sticks, adhere them onto the wall side-by-side.

Create a wave-like pattern by varying the height of the sticks. Repeat with the Surf, Summer Haze, and Sea Lavender colored sticks.

To complete the beachy look, sprinkle cupcakes with crushed graham crackers and top with fondant surf boards and mini parasols. For the ombre cupcake wrappers, paint each color on heavy card stock, then trace and cut out the wrappers from a template. Finally, cut out the words "Hang Ten" (how perfect for a 10th birthday party) from kraft paper and string with microfilament.


It's also been way too long since I've teamed up with Heather of Chickabug and blog contributor, Xiaolu of 6 Bittersweets, don't you think? Well, you won't have to wait much longer. Look for our Mother's Day collaboration, with free printables, another Anthro inspired tutorial, and a lemony cake recipe at the end of the month.
Linking up to: Whipperberry / Kojo Designs / Tatertots and Jello
For this DIY project, you'll need:
* 32 5 gallon wooden paint stirring sticks -- I scored these for free at my local Sherwin Williams paint store
* Martha Stewart Crafts multi-surface satin acrylic craft paint in Pond, Surf, Summer Haze, and Sea Lavender
* Paint brush
* Painter's tape
Paint 8 sticks (all sides except for the back) with the Pond paint color. Repeat with the Surf, Summer Haze, and Sea Lavender paints.
When the paint has completely dried, place rolled up pieces of painter's tape on the back of each stick. Starting with the Pond colored sticks, adhere them onto the wall side-by-side.
Create a wave-like pattern by varying the height of the sticks. Repeat with the Surf, Summer Haze, and Sea Lavender colored sticks.
To complete the beachy look, sprinkle cupcakes with crushed graham crackers and top with fondant surf boards and mini parasols. For the ombre cupcake wrappers, paint each color on heavy card stock, then trace and cut out the wrappers from a template. Finally, cut out the words "Hang Ten" (how perfect for a 10th birthday party) from kraft paper and string with microfilament.
It's also been way too long since I've teamed up with Heather of Chickabug and blog contributor, Xiaolu of 6 Bittersweets, don't you think? Well, you won't have to wait much longer. Look for our Mother's Day collaboration, with free printables, another Anthro inspired tutorial, and a lemony cake recipe at the end of the month.
Linking up to: Whipperberry / Kojo Designs / Tatertots and Jello
DIY Fondant Toppers
Whew! I just got around to pinning all 132 projects that were collected from the last four Party Tutorial Contests. There were so many creative tutorials! You can find all of my DIY boards, including the one for these DIY Fondant Toppers, here.

From left to right: Bugs toppers via The Decorated Cookie / Owl toppers via Crave, Indulge, Satisfy / Rabbit topper via Wee Love Baking / Sailboat toppers via Bird's Party / Angry Birds toppers via Pure Joy Events / T-rex topper via A Baked Creation / Train topper via Chickabug / Baby booties Frog Prince Cake & Cookie Design / Flower toppers via Bump Smitten
Looking for the perfect everyday dress? Today's the last day to enter our Shabby Apple dress giveaway. Go here for complete details.
From left to right: Bugs toppers via The Decorated Cookie / Owl toppers via Crave, Indulge, Satisfy / Rabbit topper via Wee Love Baking / Sailboat toppers via Bird's Party / Angry Birds toppers via Pure Joy Events / T-rex topper via A Baked Creation / Train topper via Chickabug / Baby booties Frog Prince Cake & Cookie Design / Flower toppers via Bump Smitten
Looking for the perfect everyday dress? Today's the last day to enter our Shabby Apple dress giveaway. Go here for complete details.
DIY Backdrops
During the holiday season, I wrote a post about Anthropologie window displays and how they can be a source of inspiration when styling parties. So when I stopped by Anthropologie during my lunch break today, of course I had to check out their latest display. From far away, I never would have guessed that behind the store letters were paint stirring sticks. They really have a way of taking ordinary, everyday objects and turning them into works of art. A while back, they had an amazing display using dozens of wooden coat hangers.

Anyway, it got me thinking about starting a new blog series. Every month (or so), I'm going to take an Anthropologie window display and show you step-by-step how to recreate the look at home. How fabulous would it be to create an ombre version of this for a dessert table backdrop?
In the meantime, I wanted to share the collection of DIY backdrops that I've been pinning. It's no surprise that the pin board includes many of the blogs that were highlighted in my recent link love post.


Oh, and by the way, my Vintage Sewing Party is one of the finalists over at Me and My Insanity's Party Party. Please head over and cast your vote before Sunday night. Thanks so much!
Anyway, it got me thinking about starting a new blog series. Every month (or so), I'm going to take an Anthropologie window display and show you step-by-step how to recreate the look at home. How fabulous would it be to create an ombre version of this for a dessert table backdrop?
In the meantime, I wanted to share the collection of DIY backdrops that I've been pinning. It's no surprise that the pin board includes many of the blogs that were highlighted in my recent link love post.
Paper Flower Backdrop via Tradewind Tiaras

Building a Better Dessert Table Backdrop via Frog Prince Paperie
Festive Streamer Backdrop via 100 Layer Cake

Paper Plate Backdrop via Piggy Bank Parties

Ripped Fabric Curtain Backdrop via Libby Lane Press
Oh, and by the way, my Vintage Sewing Party is one of the finalists over at Me and My Insanity's Party Party. Please head over and cast your vote before Sunday night. Thanks so much!
DIY Chandeliers
DIY chandeliers can add a touch of elegance or whimsy to your next celebration. Hang them over a dessert table or dining table for visual impact. Want to see more eye candy? Come check out my Pinterest board.


Yarn Chandelier by Libby Lane Press via Hostess with the Mostess
Doily Chandelier via Martha Stewart Weddings / Bubble Chandelier via 100 Layer Cake
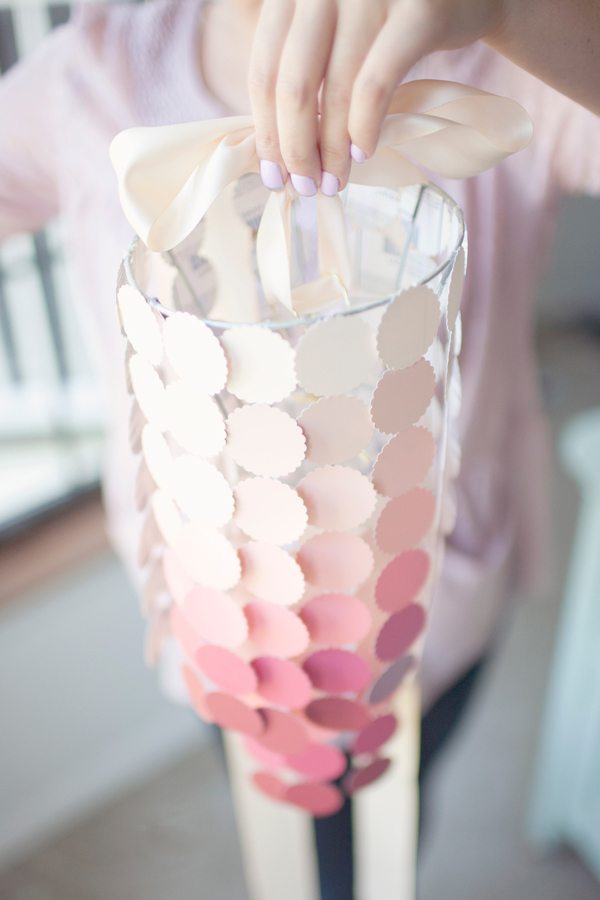
Paint Swatch Chandelier via Hey Gorgeous
Rock Candy Chandelier via Once Wed / Beaded Chandelier via Dollar Store Crafts
Inspiring Party Tutorials of 2011
Some of my favorite party tutorials from 2011 were the ones that I actually followed, or at least wanted to try. I love that they are so versatile -- perfect for all kinds of occasions.


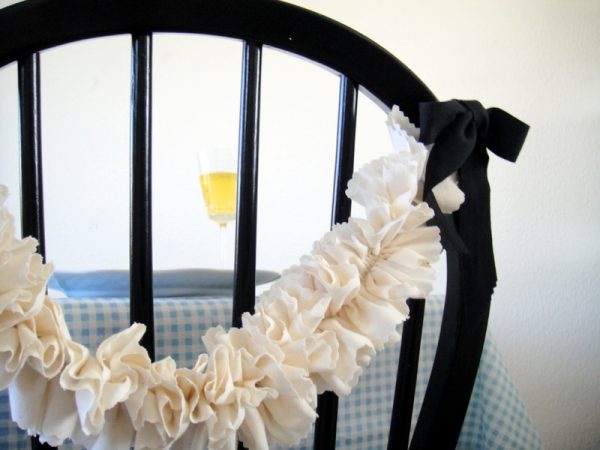
Ruffled Garland by Hank + Hunt via The Sweetest Occasion

Pomander Flower Ball by Frog Prince Paperie via Pizzazzerie

Tissue Tassel Garland via Visual Vocabulary

Inflatable Birthday Invitation via Funkytime

Ruffle-icing Cake via Mini The Happy Home

Zig Zag Accordion Streamers via Oh Happy Day

Dixie Cup Garland via Hey Gorgeous
Tutorial: Angry Birds Fondant Toppers
The stunning cakes that you see at just about all of my events are made by my friend, Loan of PhoebeCakes. She's a pharmacist who picked up cake decorating just a few years ago. For someone who never played with Play Doh growing up, her fondant creations always get lots of "oohs and aahs" from our guests. I'm sure you remember the cakes that she made for the Lullaby Baby Shower, Vintage Sewing Birthday Party, and Transformers Birthday Party.
Well it turns out that Loan lives just down the road from Xiaolu, our newest blog contributor from 6 Bittersweets, so we all got together a few weeks ago to shoot this tutorial for Angry Birds fondant toppers.

Here are the supplies you'll need:
* red, white, yellow, black and green fondant
* tylose or water for the "glue"
* rice krispies treats
* fondant roller
* black edible marker
* round piping tips
* round cutters
* small brush
* exacto knife
* dresden tool (optional)

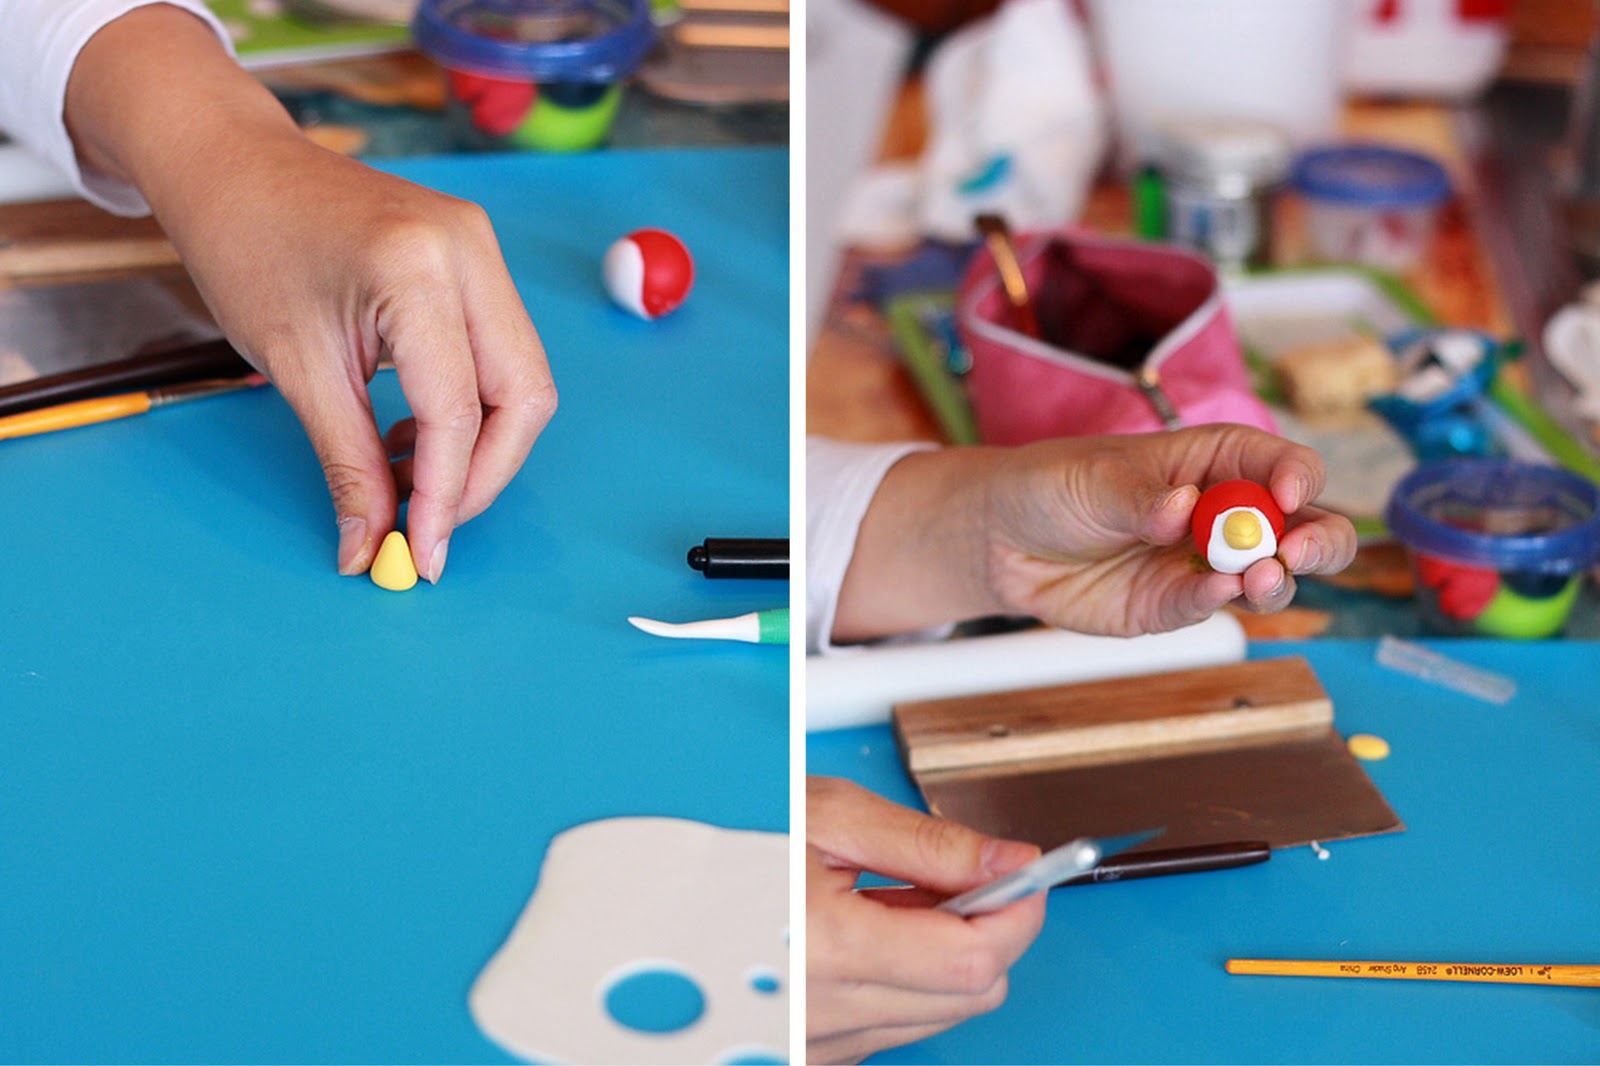
First, roll the rice krispies treats into a ball the size of a gumball. Then knead the red fondant until it becomes soft and pliable. Roll out the fondant and cut out with a 2" round cutter.

Wrap the rice krispies treats ball completely with the fondant, then roll between your hands to remove the seams.

Roll out the white fondant. Cut out with a 1" round cutter and roll into an oval. Brush with a small amount of tylose or water and adhere to the red ball.

Shape the yellow fondant into a small cone, glue on the beak and score with an exacto knife.

For the eyes, cut out 2 white circles with a small piping tip and glue above the beak. Draw in the pupils with the black edible marker. For the eye brows, make elongated tear drops from the black fondant and glue above the eyes.

Now for the finishing touches. Form a red tear drop, score to create the head feathers, then glue to the top. For the tail feathers, form a black tear drop, score twice, then glue to the back.

On to the green pig! Follow the steps above to make the head. Form an oval for the snout, glue onto the head, then use the dresden tool to create the nostrils. For the eyes, cut out 2 white circles with a small piping tip and glue above the sides of the snout. Draw in the pupils and eye brows with the black edible marker.

Lastly, form 2 tear drops for the ears, press down the center with the dresden tool, and glue to the top of the head.

Thanks, Loan for sharing the tutorial. Visit PhoebeCakes to see more of her incredible fondant creations, including a whole Angry Birds cake.
Photography: 6 Bittersweets
Well it turns out that Loan lives just down the road from Xiaolu, our newest blog contributor from 6 Bittersweets, so we all got together a few weeks ago to shoot this tutorial for Angry Birds fondant toppers.

Here are the supplies you'll need:
* red, white, yellow, black and green fondant
* tylose or water for the "glue"
* rice krispies treats
* fondant roller
* black edible marker
* round piping tips
* round cutters
* small brush
* exacto knife
* dresden tool (optional)

First, roll the rice krispies treats into a ball the size of a gumball. Then knead the red fondant until it becomes soft and pliable. Roll out the fondant and cut out with a 2" round cutter.

Wrap the rice krispies treats ball completely with the fondant, then roll between your hands to remove the seams.

Roll out the white fondant. Cut out with a 1" round cutter and roll into an oval. Brush with a small amount of tylose or water and adhere to the red ball.

Shape the yellow fondant into a small cone, glue on the beak and score with an exacto knife.
For the eyes, cut out 2 white circles with a small piping tip and glue above the beak. Draw in the pupils with the black edible marker. For the eye brows, make elongated tear drops from the black fondant and glue above the eyes.

Now for the finishing touches. Form a red tear drop, score to create the head feathers, then glue to the top. For the tail feathers, form a black tear drop, score twice, then glue to the back.

On to the green pig! Follow the steps above to make the head. Form an oval for the snout, glue onto the head, then use the dresden tool to create the nostrils. For the eyes, cut out 2 white circles with a small piping tip and glue above the sides of the snout. Draw in the pupils and eye brows with the black edible marker.

Lastly, form 2 tear drops for the ears, press down the center with the dresden tool, and glue to the top of the head.

Thanks, Loan for sharing the tutorial. Visit PhoebeCakes to see more of her incredible fondant creations, including a whole Angry Birds cake.
Photography: 6 Bittersweets


Subscribe to:
Posts (Atom)


