Showing posts with label Tutorial Tuesday. Show all posts

Tutorial Tuesday: DIY School Theme Baby Shower

It's no surprise that Heather of Did Someone Say Party? was one of the winners from the last Party Tutorial Contest. The school theme baby shower that she threw in honor of her sister-in-law was loaded with DIY party projects. From the library book card invitation to the banner displaying photos from love ones from out-of-town, this party was pure genius! I can't get over how creative the invitations, decorations, games, and favors were.


Visit Did Someone Say Party? for the full scoop:
Shower Invitations
Monogram Wreath
Shower Menu
Photo Banner
Shower Décor
Shower Activities and Game
Shower Favors and Corsage

Tutorial Tuesday: DIY Cake Boss Party

Jen of Passion for Parties knows how to throw a party. Her Cake Boss birthday party was packed with so many creative ideas and DIY projects, she had to share the pictures and details in five separate posts. To help readers recreate elements from the party, she shows you how to make a cake stand from dollar store items, design a personalized baking hat, and turn a plain white apron into an adorable ruffled apron.


Thanks, Jen, for letting me feature your cute tutes. Do you have a DIY party tutorial that you would like to share? Send your submissions to christine@purejoyeventsblog.com.

Tutorial Tuesday: DIY Piggies Party

I've been meaning to share this Springtime Piggies Party that Steph threw for her twins, who were born in the Year of the Pig (like moi). You know how I love a good party tutorial, and Steph shares a few of them on her blog -- a graphic pig using Picnik, a super creative and fun party blower wreath, and colorful crayon favors. Visit The Silly Pearl to get the complete "how-to's". While you're there, be sure to check out her We Love Dada Week Round Up for DIY gift ideas.


And you don't want to miss our Party Tutorial Contest! Link up your DIY projects for a chance to win some fabulous prizes totaling over $200 from Bird's Party, Love Party Printables, and Love the Day.

Tutorial Tuesday: No-Sew Table Runner

I'm so excited to have Adriana from And Baby Makes Three as our guest blogger today. If you're like me and hate breaking out the sewing machine, be sure to check out her easy no-sew project.

Thank you Christine for sharing my No-Sew Table Runner tutorial. For my son’s recent Robots & Rockets 2nd birthday party I wanted to make a table runner to add to the party décor, unfortunately sewing is not a skill I posses, so I cheated a little. I made a no-sew table runner, it was super easy to make and actually turned out a lot nicer than thought it would; even my friends who sew were impressed! Here are the steps to make your very own no-sew table runner.

Materials Needed:
  • Fabric
  • Stitch Witchery (fusible bonding web)
  • Grosgrain Ribbon
  • Scissors
  • Iron
  • Ironing Board
1. Cut your piece of fabric to your desired table runner length and width, then iron out any wrinkles.


2. Starting on one side, place you fusible bonding web along the edge of your fabric leaving a small edge of fabric free.


3. Place your ribbon over the fusible bonding web and the fabric and iron them together. I suggest doing this in 12 inch sections to avoid an uneven attachment.

4. Repeat this step on all three sides of the fabric overlapping the ribbon on each corner.


In less than an hour you will have your very own DIY table runner, no sewing machine required!

Thanks, Adriana. Visit And Baby Makes Three to see all of the incredible details from her party. Do you have a DIY project that you'd like to submit? Be our guest (blogger, that is)! And stop back tomorrow for the full scoop on the next Party Tutorial Contest.

Tutorial Tuesday: Glittery Prom Girl

Melissa from Buckets of Grace is in the house! She's here to share a DIY project from her daughter's Enchanted Prom Birthday Party.

Thank you to Christine for featuring a tutorial on Grace's Glittery Prom Girl. The Prom Girl was the belle of the ball!  Not only was she adorable, but she was inexpensive and easy to make.  This technique can be used for any sort of decoration - a large monogram, a dinosaur, the possibilities are endless!

Here are the materials you will need:
* Transparency
* Photo copier
* Overhead projector
* Exacto knife
* Matte board
* School glue
* 1 or 2 bottles of glitter
* Spray lacquer
* Large frame (optional)
* Fabric (optional)
* Satin ribbon (optional)


  1. Take the invitation and transfer the Prom Girl to a transparency using a photo copy machine.


  2. Use an overhead projector to project the image. Then trace the image onto a piece of matte board (purchased from Hobby Lobby for 50% off).
  3. Use an exacto knife to carefully cut out the image.
  4. Put glue on one workable section at a time, then spread it with your finger. Working quickly, sprinkle the glitter over the glue.  Repeat this until the entire object is covered in glitter.
  5. Allow the glue and glitter to dry, then spray the Prom Girl with lacquer.  Spray on a few coats, allowing it to dry between coats.
  6. Staple fabric to the back side of the frame using a staple gun.
  7. Once the Prom Girl is completely dry, staple her to the frame.  If she fits in the frame, use hot glue or fabric glue to adhere her to the fabric.
  8. Staple a piece of satin ribbon to the center of the frame to create an illusion that she is hanging from the ribbon.  Finally, hang the frame from a nail on the wall.
Here is the final product!


I couldn't part with the Prom Girl after the party.  She now proudly hangs in my craft room as a sparkly new addition!

Thank you Christine for letting me share our fun project on your fabulous site!

Tutorial Tuesday: DIY Despicable Me Party

OK, I've been slacking a bit on the posts lately. To be honest, after planning and hosting at least one party a month since last July, I'm all partied out! I've decided to take a little break to spend more time with the kids, catch up chores, and get some much needed zzzz's. When June rolls around, I'll be in party mode again planning Caitlyn's 7th birthday party.

Speaking of June, I'm hosting another Party Tutorial Contest to celebrate my first blogging birthday (wahoo!). I can't wait to announce who the special guest judge will be. Hint: She is a super talented designer and stylist, and the first person to feature my parties when I started blogging. Of course, there will be some fabulous prizes. Stay tuned for more details.

Now for today's tutorial. I've been meaning to share this Despicable Me Birthday Party from Emilie Handmade ever since I saw it on Ucreate Parties. She shows you how to make everything from the invitations to the Minion bowling pins and cupcakes, and even provides all of the printables for download. How despicably cool is that?

Tutorial Tuesday: DIY Olivia Party

Olivia, written and illustrated by Ian Falconer, is still one of our favorite children's book. It's hard not to find her totally adorable. This little piggy is imaginative, spunky, and full of energy -- a lot like my daughter. So when I saw this Olivia birthday party on Dana Made It, I knew I had to share it. It's filled with easy DIY projects, plus creative party games and activities. Dana kept everything simple and focused on making it fun for the 3 to 5 year old guests. Learn know to make Olivia invitations, polka dotted skirts, cupcake flags, and more on her blog.

Tutorial Tuesday: Edible Easter Basket

Easter is just a hippity hop, skip, and jump away, so I can't think of a better time to feature the chocolate Easter basket tutorial from Wants and Wishes. The full "how to" can be found here. In Debbie's own words, "this would be beautiful at each place setting for your Easter dinner after your Easter Egg Hunt and games with the kids. Or give them as gifts as they walk out. Place in clear plastic boxes with some colored crate paper, topped with a bright bow and one of our Easter tags." Debbie also shares her tips for making an eye catching centerpiece here. And if you're looking for last minute Easter printables, Wants and Wishes' entire Easter collection is on sale now at 50% off.

Tutorial Tuesday: Apple Pencil Cake Pops

Did you happen to catch Harper's Vintage Schoolhouse 1st Birthday Party featured on Kara's Party Ideas and Pizzazzerie? Audrey of Sweet Cheeks did such an incredible job with the details and styling, and even shares the tutorial for the darling apple pencil cake pops.

Tutorial Tuesday: Paper Flower Wreaths

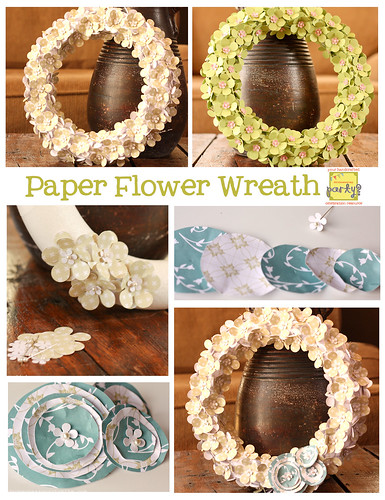
Heather of Did Someone Say Party shows you how to create these gorgeous paper flower wreaths without getting FPHS (Flower Punch Hand Shake). Go here for the step-by-step tutorial. Starting this Friday, I'll be rounding up DIY projects for your Easter/Spring party, so be sure to check back all month long for more ideas and inspirations.

Paper Flower Wreath Collage copy

Tutorial Tuesday: Cupcake Decorating

Hold on to your piping bags people -- you're about to learn how to make gorgeous swirls and artfully placed dollops of icing on cupcakes, and it's not as hard as you might think! Our new blog contributor, Kristen from  Decorate This!, shares her cupcake decorating tutorial here. In April, be sure to catch Kristen's first guest post on how to make french macarons for your Easter or Spring party.

Tutorial Tuesday: Robot Felt Board

Today's tutorial comes from Miranda, a freelance craft designer who contributes to Disney Preschool and Family.com. Wouldn't you just love to have her job? This build-your-own robot felt board would make a great craft for a robot theme party. Glue the robot pieces onto a card to make one of a kind invitations, or use the framed boards as party decorations.


Visit Miranda Made for this tutorial, and many more creative projects. She even has a super cute cupcake version.

Have you heard about our Party Tutorial Contest? We're giving away prizes from Le Box Boutique, Frog Prince Paperie and Candy and Cake to the top three tutorials. Go here to enter.

Tutorial Tuesday: Fabric Flower Cupcake Topper

I'm going bananas over the fabric flower cupcake toppers from Paiges of Style's Monkey Party. Paige shows you how to make these darling cupcake toppers, step-by-step, here.


Do you have a party tutorial you'd like to share? Please send your submissions to christine@purejoyeventsblog.com.

Tutorial Tuesday: Bird House Treat Box

DIY projects are by far my favorite part about party planning. So starting today, I'm doing a new weekly series called "Tutorial Tuesday", where I feature tutorials from some of my favorite parties, as well as other craft projects that you can do for your next party.

I'm thrilled to be kicking off the series with a bird house treat box tutorial from Leoni over at Just Call Me Martha. Using fabric scraps and cardboard, Leoni crafted these sweet treat boxes for her niece's bird theme birthday party.


For complete instructions, visit Just Call Me Martha. If you would like to share a party tutorial, please send your submissions to christine@purejoyeventsblog.com.


And now for the winner of the Did Someone Say Party giveaway. Congratulations to Oh Gorgeous Baby! Thanks for entering. Enjoy the the $57 gift certificate to Did Someone Say Party's shop.
previous home